How to Install eSIM on iPhone
Step-by-step guide to install eSIM on your iPhone. Easy setup with QR code or manual entry. Works with iPhone XS and newer models. Get connected in 5 minutes!
Quick Setup Overview
Installing your Soovia eSIM on iPhone takes just 5 minutes. This guide will walk you through every step with clear screenshots. You can install using a QR code (fastest method) or by entering details manually.
📱 Before You Start:
- Your iPhone must be unlocked (not carrier-locked)
- Compatible with iPhone XS and newer models
- You need an active internet connection (Wi-Fi or cellular)
- Have your eSIM QR code or activation details ready
Method 1: Install eSIM Using QR Code (Recommended)
This is the fastest and easiest way to install your eSIM. Follow these steps:
Step 1: Open Settings and Go to Cellular
- Open the Settings app on your iPhone
- Tap on Cellular or Mobile Data
- Select Add eSIM

Step 2: Choose Installation Method
You'll see several options for adding your eSIM:
- Use QR Code - Select this for the quickest setup
- Transfer From Nearby iPhone
- Use a Carrier App
- Enter Details Manually - Use this if you don't have a QR code
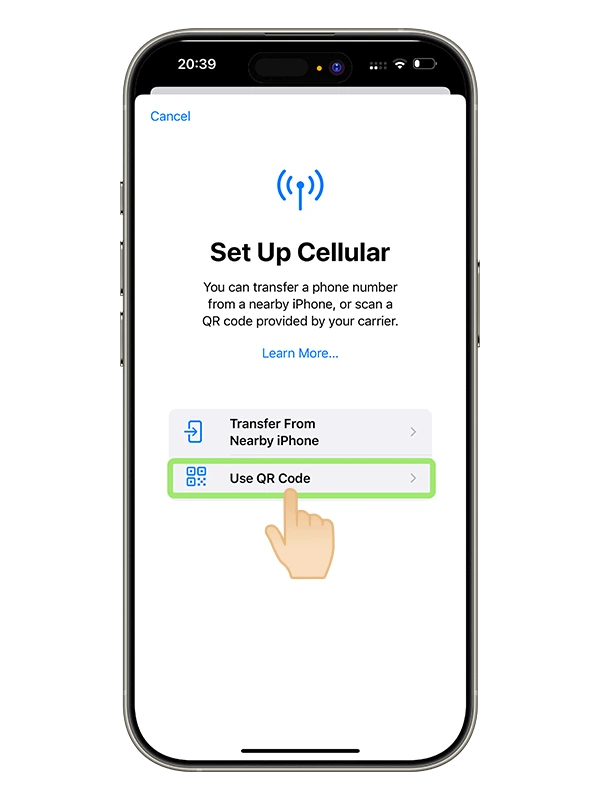
Tap on "Use QR Code" to continue.
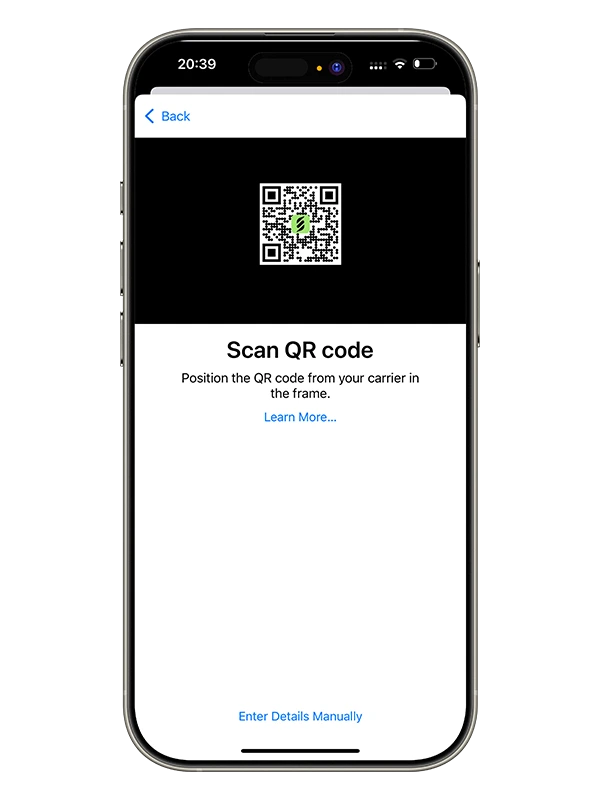
Step 3: Scan Your eSIM QR Code
- Your iPhone camera will activate automatically
- Position the QR code within the frame
- The code will be detected automatically
- Tap Continue when prompted
💡 Pro Tip:
Can't scan the QR code? Make sure you're in a well-lit area and hold your phone steady. If scanning doesn't work, use Method 2 below to enter details manually.
Step 4: Label Your eSIM
Give your eSIM a descriptive name like "Travel eSIM" or "Europe Data" to easily identify it. This is especially useful if you have multiple eSIMs.
Step 5: Set as Default Line
Choose how you want to use your new eSIM:
- Default Line - For calls and messages
- Cellular Data - For internet connection
For most travelers, select your eSIM as the Cellular Data line to use it for internet while keeping your primary SIM for calls.
Step 6: Configure Network Settings (Important!)
After installing your eSIM, you need to configure these settings for it to work properly:
✅ Enable Data Roaming
- Go to Settings → Cellular
- Tap on your eSIM line
- Toggle Data Roaming to ON (green)

⚠️ Important:
Data roaming MUST be enabled for your eSIM to work abroad. Don't worry - with Soovia plans, you won't be charged extra roaming fees. Your plan includes all data at a fixed price.
✅ Set Network Selection to Automatic
- While in your eSIM settings, scroll down to Network Selection
- Make sure Automatic is turned ON
- Your iPhone will automatically connect to the best available network
- If you experience issues, you can manually select a network from the list
🔄 Auto-Switch Networks:
With "Automatic" network selection enabled, your iPhone will intelligently switch between available networks in your destination country to ensure you always have the best connection.
✅ Verify LTE/5G is Enabled
- In your eSIM settings, look for Voice & Data
- Select LTE or 5G for fastest speeds
- This ensures you get maximum performance from your data plan
Step 7: Installation Complete!
Your eSIM is now installed and configured! It will automatically activate once you arrive at your destination. You'll see both your primary SIM and your eSIM listed in your Cellular settings.
✅ You're All Set!
When you land at your destination, wait 1-2 minutes for automatic connection. You should see signal bars and network name appear. Try opening a website to confirm you're connected!
Method 2: Install eSIM Manually (Without QR Code)
If you can't scan the QR code or prefer manual entry, follow these steps:
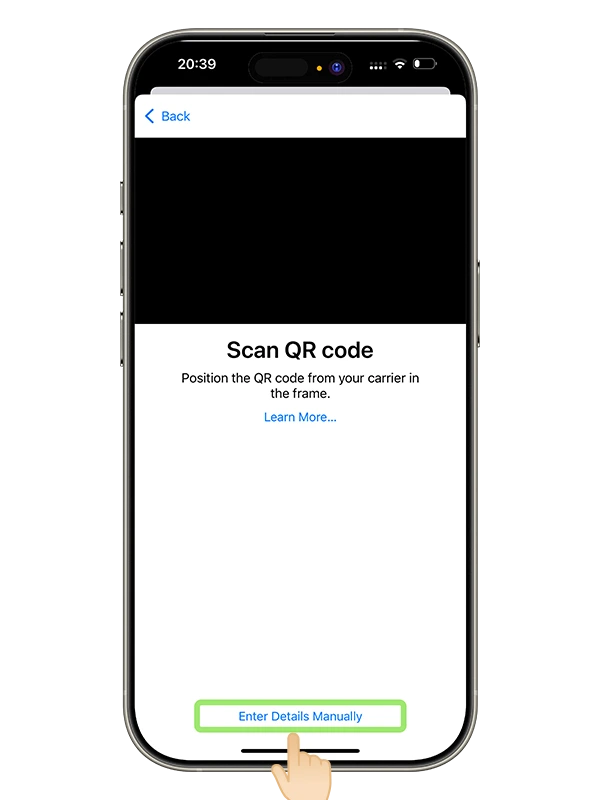
Step 1: Access Manual Entry
- Go to Settings → Cellular → Add eSIM
- Select Enter Details Manually
Step 2: Enter Your eSIM Details
You'll need to enter the following information. Find these details in your Soovia account under My eSIMs → View Details:
- SM-DP+ Address - The server address (starts with numbers)
- Activation Code - Your unique eSIM activation code
- Confirmation Code - If required (usually left blank)
⚠️ Important:
Enter the details exactly as shown in your account. Even a small typo will prevent activation. Copy and paste if possible to avoid errors.
Step 3: Complete Installation
After entering all details correctly:
- Tap Next
- Wait for the eSIM to download (30-60 seconds)
- Label your eSIM
- Configure default line settings
Step 4: Configure Network Settings (Important!)
Just like with QR code installation, you need to enable these settings:
- Go to Settings → Cellular
- Tap on your eSIM line
- Toggle Data Roaming to ON (green)
- Scroll down to Network Selection and ensure Automatic is turned ON
- Check Voice & Data settings and select LTE or 5G for fastest speeds
✅ Done!
Your eSIM is ready! It will activate automatically when you reach your destination.
Troubleshooting Common Issues
eSIM Won't Download
- Check your internet connection (Wi-Fi or cellular)
- Restart your iPhone and try again
- Verify your iPhone is carrier-unlocked
- Ensure you haven't used this eSIM on another device
No Network Connection
- Verify Data Roaming is enabled for your eSIM
- Toggle Airplane Mode on/off
- Manually select a network: Settings → Cellular → [Your eSIM] → Network Selection → Turn off Automatic and choose a network
- Wait 5 minutes for automatic connection
- Restart your iPhone
QR Code Won't Scan
- Ensure good lighting conditions
- Clean your camera lens
- Try holding the QR code at different distances
- Use Method 2 (manual entry) as an alternative
Slow Internet Speeds
- Check if LTE/5G is enabled in your eSIM settings
- Try manually selecting a different network
- Move to a location with better signal
- Check your data balance in your provider's app
🆘 Still Having Issues?
Contact our 24/7 support team through the Soovia app or email [email protected]. We're here to help you get connected!
Frequently Asked Questions
Can I install multiple eSIMs on iPhone?
Yes! iPhone models from XS onwards support multiple eSIM profiles. However, you can only use 2 lines simultaneously (1 physical SIM + 1 eSIM, or 2 eSIMs on iPhone 13 and newer without physical SIM).
Will installing an eSIM remove my current SIM?
No, your existing physical SIM or eSIM will remain active. You'll have both lines available and can switch between them in Settings.
When should I install my eSIM?
You can install your eSIM anytime - even before your trip. It will only start using data once you activate it at your destination by enabling Data Roaming.
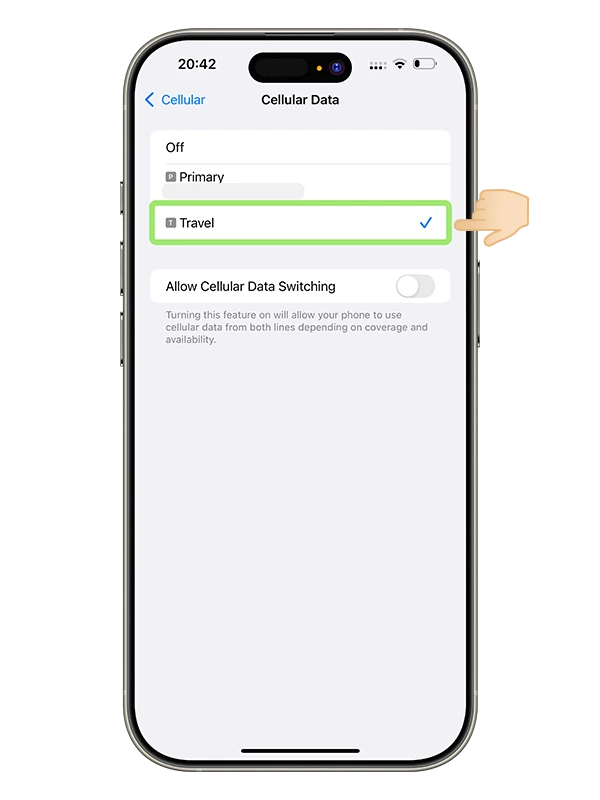
How do I switch between SIM cards?
Go to Settings → Cellular → Cellular Data and select which line you want to use for internet. You can switch anytime without reinstalling.
Can I delete and reinstall my eSIM?
Important: Most eSIMs can only be installed once. If you delete it, you may not be able to reinstall it. Only remove your eSIM if you're certain you won't need it again.
Do I need to turn off my primary SIM's data roaming?
It's recommended to turn off data roaming on your primary SIM to avoid accidental charges. Go to Settings → Cellular → [Your Primary SIM] → Turn OFF Data Roaming. Keep it on only for your travel eSIM.
Will my phone number work with the eSIM?
Most travel eSIMs are data-only. Your primary phone number from your home SIM will still work for calls and texts. You're just using the eSIM for internet data.
Next Steps
Now that your eSIM is installed and configured, you're ready to travel! Here's what to do:
- Keep Your eSIM Installed - Leave it on your phone until you arrive at your destination
- Check Your Data Balance - Monitor usage through your provider's app in real-time
- Test Your Connection - Once you land, open a browser to confirm internet access
- Manage App Data - Configure which apps can use cellular data in Settings
- Save Support Info - Add your provider's support contact for easy access if needed